Flashing your PiBox#
The PiBox is built around the Raspberry Pi 4 Compute Module. The Compute Module has two options for boot storage: SD card or onboard flash (eMMC). You can use this guide to flash your Pi’s eMMC.
Note
Unless you ordered your PiBox with no Compute Module (advanced users), then you received a PiBox with eMMC and an OS pre-installed. You can use to use this guide to re-flash it. We only ship modules with onboard flash due to its substantially faster performance.
Installing the rpiboot tool#
In order to re-flash the boot disk on the pi (commonly called eMMC), you will need to install a utility called rpiboot.
- For Windows users, install the
rpibootinstaller. - For Mac & Linux users, follow the build instructions and return to this page.
Installing the Raspberry Pi Imager#
Raspberry Pi maintains an excellent utility for flashing devices on every OS. Download and install it here: https://www.raspberrypi.org/software/
Flashing the Image#
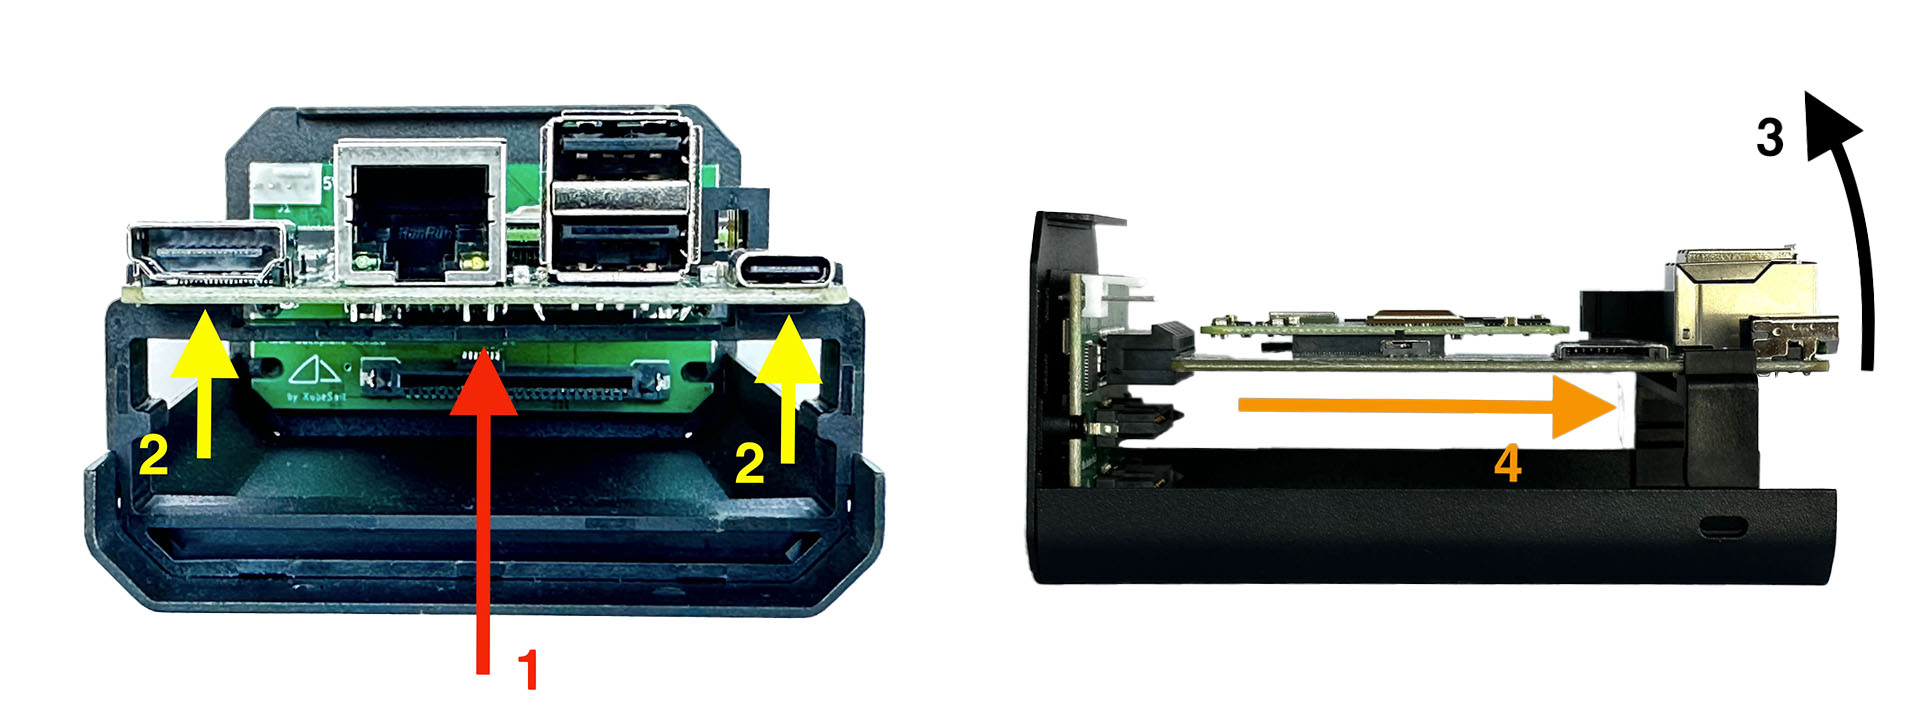
- Open the PiBox using the two screws on the back. The top clamshell case slides back and lifts up to reveal the Carrier board (large horizontal PCB) and the Backplane (small vertical PCB in front)
-
Disconnect the PiBox’s Carrier board from the Backplane.

- Push up in the middle & bottom side of the SSD tray. This relieves the pressure on the circuit board from the side tabs.
- Push up on either side of the circuit board to wiggle it free from the tabs.
- Lift the Carrier board to a ~15 degree angle
- Pull the Carrier board straight out of the backplane
-
Switch the “Boot Mode” switch on the Carrier to “rpiboot”.
- Connect a USB-C cable to the USB-C port on the backplane, and to your PC.
- Run
sudo ./rpiboot(Mac / Linux) or theRpiBootexecutable atC:\Program Files (x86)\Raspberry Pi\RPiBoot.exe(Windows). This will turn your Pi’s eMMC into a mass storage device, allowing you to write the OS directly to the eMMC. - Open the Raspberry Pi Imager
- Select an OS
- Download our latest OS image from GitHub
- Or, flash your own OS. We recommend starting with Raspberry Pi OS 64-bit
- Choose
RPi-MSD- 0001as your storage location. - Click
Write. - You may want to touch the file
/boot/sshto enable SSH when the pibox boots - otherwise you will need a keyboard & monitor - If using our image, you may also write your username to
/boot/github-ssh-username.txt, and your GitHub SSH keys will be automatically copied for easier log-in.
- Select an OS
- Flip the “Boot Mode” switch on the Carrier back to
normal - Unplug the carrier from your PC and re-assemble the PiBox.
Warning
The USB port and / or cable you use are using may affect the ability to boot into rpiboot mode successfully. If rpiboot stalls or you seen an error code like Failed to write correct length, returned -9, then try plugging into a different port on your PC, or swapping out the cable you are using.
Enabling USB, SATA, and Display support#
If you aren’t flashing one of our pre-built images, you will need to make some modifications to your installation to get full use out of the PiBox hardware. See the Operating System page for instructions.