Using a custom Linux OS on your PiBox#
We maintain and distribute a modified 64-bit Raspberry Pi OS image which is pre-configured to be perfect for the PiBox. The rest of this page contains the instructions for making those modifications yourself if you decide to reflash your PiBox. In general, the modifications we make are:
- Fan support (PWM) for quiet fan operation
- SATA Kernel modules
- Install Kubernetes (via K3s)
- Tweaks for stability and performance
- Display kernel modules for the 1.3” front panel display
If you’re using our OS Image, this guide has already been completed for you! You can also start with the base 64-bit Raspberry Pi image from https://downloads.raspberrypi.org/raspios_arm64
Dedicating an SSD to Kubernetes#
Important
We recommend using one or more SSDs for your Kubernetes installation and storage. You’ll want to format a disk and mount it at /var/snap before installing Kubernetes. This storage can then be used by Kubernetes for it’s storage system. This piece is optional, but we strongly recommend it!
Danger
If you’ve already installed K3s, please first uninstall with /usr/local/bin/k3s-uninstall.sh
Take a look to see if your disks have been detected: lsblk | fgrep disk - if not, try updating the OS with apt update && apt upgrade and restart. If you still don’t see your disks, see the “Enabling the SATA Kernel Module” section below.
# Format the entire /dev/sda disk (WARNING! This will wipe data!)
sudo parted -a opt /dev/sda mkpart primary ext4 0% 100%

# Format the partition
sudo mkfs.ext4 -L kubernetesdata /dev/sda1

# Mount the partition in place! K3s usually lives at "/var/lib/rancher", whereas microk8s uses "/var/snap"
sudo mkdir -p /var/lib/rancher
sudo bash -c "echo '/dev/sda1 /var/lib/rancher ext4 defaults,nofail,noatime,discard,errors=remount-ro 0 0' >> /etc/fstab"
Install K3s#
K3s is our preferred Kubernetes distribution. It’s maintained by Rancher, is updated regularly, and performs well on low-power devices, such as Raspberry Pis. Other distributions of Kubernetes should work fine on the PiBox and with KubeSail.com, but this guide focuses on K3s. We recommend K3s over Microk8s because of its dramatically reduced resource requirements as of the time of writing (11/1/2021)
# On Raspberry PI OS, the path is /boot/cmdline.txt, on Ubuntu it's /boot/firmware/cmdline.txt
# TLDR: Add 'cgroup_enable=memory cgroup_memory=1' to that file and reboot
sudo bash -c "grep -qxF 'cgroup_enable=memory cgroup_memory=1' /boot/cmdline.txt || sed -i 's/$/ cgroup_enable=memory cgroup_memory=1/' /boot/cmdline.txt"
sudo reboot

# Install K3s - see https://k3s.io/ for more
curl -sfL https://get.k3s.io | INSTALL_K3S_CHANNEL=latest sh -
Enabling PWM Fan Support#
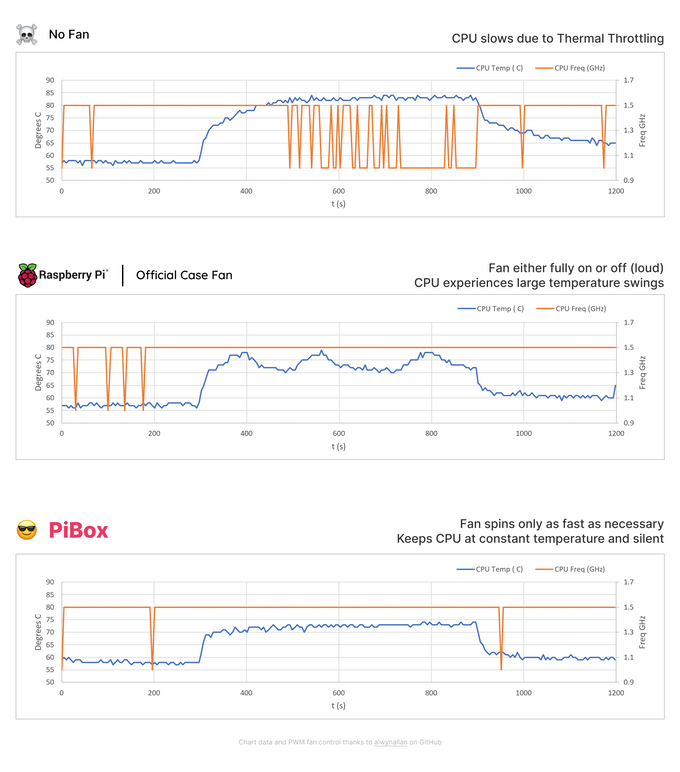
The PiBox emits a PWM control signal so the fan only spins as fast as necessary. This makes it quieter than even the Official Raspberry Pi Case fan, and keeps the CPU from experiencing large temperature swings, which should lead to longer CPU life for your Pi. Typically this is done via a dedicated controller chip, however due to the ongoing chip shortage these chips are not possible to source. But thanks to some clever code from alwynallan on GitHub, we are able to ship a silent PiBox now, with no delays. This code can be found in our fork of alwynallan‘s original gist on GitHub.
git clone https://github.com/kubesail/pibox-os.git
cd pibox-os/pwm-fan
tar zxvf bcm2835-1.68.tar.gz
cd bcm2835-1.68
./configure && make && sudo make install
cd ..
make && sudo make install
Stress Test Data#
Enable USB (Raspberry Pi OS only)#
If you are using Raspberry Pi OS, you will need to enable the USB 2.0 ports on the Compute Module 4. Edit the boot config file at /boot/config.txt and add:
dtoverlay=dwc2,dr_mode=host
Enabling the SATA Kernel Module#
Important
Raspberry Pi OS will soon ship the SATA modules by default. Use apt update && apt upgrade to upgrade!
You may want to see if your disks are already detected (lsblk | fgrep disk) before building these modules, which can take some time. Instructions for Compiling the Ubuntu-raspi kernel can be found at https://askubuntu.com/a/1242267 and cross-compilation instructions can be found at https://github.com/carlonluca/docker-rpi-ubuntu-kernel
Enabling the SATA ports requires compiling the SATA modules into the kernel.
# Install dependencies
sudo apt install -y git bc bison flex libssl-dev make libncurses5-dev

# Clone source
git clone --depth=1 https://github.com/raspberrypi/linux

# Apply default configuration
cd linux
export KERNEL=kernel8 # use kernel8 for 64-bit, or kernel7l for 32-bit
make bcm2711_defconfig

# Customize the .config further with menuconfig
make menuconfig
# Enable the following:
# Device Drivers:
#   -> Serial ATA and Parallel ATA drivers (libata)
#     -> AHCI SATA support

nano .config
# (edit CONFIG_LOCALVERSION and add a suffix that helps you identify your build)

# Build the kernel and copy everything into place
make -j4 Image modules dtbs # 'zImage' on 32-bit
sudo make modules_install
sudo cp arch/arm64/boot/dts/*.dtb /boot/
sudo cp arch/arm64/boot/dts/overlays/*.dtb* /boot/overlays/
sudo cp arch/arm64/boot/dts/overlays/README /boot/overlays/
sudo cp arch/arm64/boot/Image /boot/$KERNEL.img

# Reboot the system
reboot
Further detailed instructions and discussion can be found on Jeff Geerling’s PCI device guide on GitHub
Optimize system for EMMC, RaspberryPI#
We’ll make a few tweaks intended to optimize disk-usage on the EMMC disk, which is the slowest component in the PiBox. These are optional steps.
# Store system logs in memory, instead of writing to disk, and lower log verbosity
sudo sed -i "s/#Storage.*/Storage=volatile/" /etc/systemd/journald.conf
sudo sed -i 's/.MaxLevelStore.*/MaxLevelStore=info/' /etc/systemd/journald.conf
sudo sed -i 's/.MaxLevelSyslog.*/MaxLevelSyslog=info/' /etc/systemd/journald.conf
sudo systemctl restart systemd-journald.service

# Disable swapfile - note that while you can use a swapspace on an SSD, Swap and Kubernetes do not play nicely for free.
# So the simplest option is to just disable swap entirely
swapoff -a
dphys-swapfile swapoff

# Mount /var/tmp as tmpfs filesystems to extend EMMC lifetime
echo "tmpfs /var/tmp tmpfs defaults,noatime,nosuid,nodev,noexec,mode=0755,size=1M 0 0" | sudo tee -a /etc/fstab
Enable support for ‘.local’ DNS Names#
KubeSail agent will automatically publish DNS addresses for domains that end in .local to your network. This requires that that operating system that KubeSail Agent runs on has avahi-daemon installed and running. Note that this is typically installed on most major operating systems, but you can make sure with:
apt install avahi-daemon
Enabling the 1.3” LCD display#
You have 2 options for using the 1.3” LCD Display:
- Use our
pibox-framebufferwhich binary draws basic stats like CPU and Memory info, along with providing a service to draw custom text and images. - Use the Adafruit Python guide, which lets you customize the display with Python. This uses more CPU, but is also more flexible.
To install the driver and our pibox-framebuffer binary:
# Clone PiBox OS repo
git clone https://github.com/kubesail/pibox-os.git

# Enable Display Driver
apt-get install raspberrypi-kernel-headers # For Raspbian / Pibox-OS, we need some additional drivers.
pushd pibox-os/st7789_module
make
# If this command fails with "/lib/modules/kernel-version not found", please try rebooting to activate your current kernel!
mv fb_st7789v.ko /lib/modules/"$(uname -r)"/kernel/drivers/staging/fbtft/fb_st7789v.ko
popd
dtc --warning no-unit_address_vs_reg -I dts -O dtb -o /boot/overlays/drm-minipitft13.dtbo pibox-os/overlays/minipitft13-overlay.dts
cat <<EOF >> /boot/config.txt
dtoverlay=spi0-1cs
dtoverlay=dwc2,dr_mode=host
hdmi_force_hotplug=1
dtoverlay=drm-minipitft13,rotate=0,fps=60
EOF
Download pibox-framebuffer binary#
curl -s https://raw.githubusercontent.com/kubesail/pibox-os/main/update-framebuffer.sh | sudo bash
Modifying the image / stats shown on the display#
Adafruit has a guide which is compatible with the display used in PiBox. We modified Adafruit’s code in combination with prometheus-png to render stats to the display. This code runs as containers within Kubernetes, installed via this template, and the source code lives in two repositories:
- Our fork of prometheus-png built for
arm64arch: https://github.com/kubesail/prometheus-png - Our python script to render the resulting PNGs to the display: https://github.com/kubesail/pibox-os/tree/main/lcd-display
Note
In our testing, if you are trying the Python “easy way”, and installing the adafruit-circuitpython-rgb-display library, you will need to install RPi.GPIO manually via pip3. Once installed, you can try installing the Adafruit library again.
CFLAGS=-fcommon pip3 install RPi.GPIO
The complete script#
For completeness, the script we use to pre-provision PiBox OS can be found on the PiBox-OS repository: provision-os.sh